Managing point clouds over time with Master Models
Pointerra's Master Model workflow is the way to manage constantly changing/updating point cloud data. It allows you to selectively (using a set of polygon regions) merge new data into an existing point cloud (your master model). The result of the selective merge is that you only keep the most up-to-date points and mask out any old or obsolete data that you want to replace. The process of working with master models effectively creates a timeline of snapshots of the environment without having to rescan the entire project area. Master model projects are a special type of project, and they have an associated "permalink" which always redirects users to the current/active master model (the point cloud with the latest data).
Terminology
Epoch - An individual point cloud scan representing the world/landscape at a specific point in time (a regular point cloud).
Master model - A point cloud that contains data from a number of epochs that have been selectively merged together with the process described on this page.
Active master model - The latest master model in the timeline, which contains the most up-to-date point cloud data.
Superseded master model - Any master model in the timeline, which no longer contains the most up-to-date data.
Permalink - A persistent URL that always takes you to the active master model - this is what you would give to users that always need to access the active master model.
Folder setup
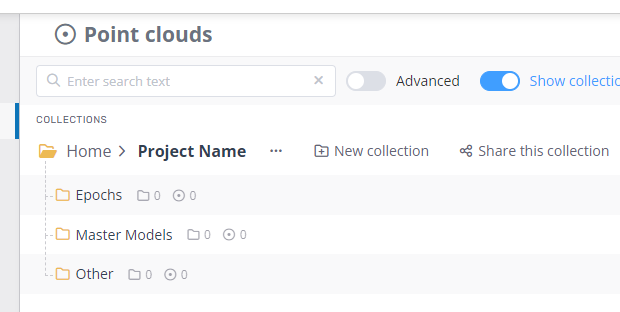
Before creating the first master model, it is suggested you set up a point cloud folder structure similar to the image below. This way you can keep your individual raw scans (epochs) separate from your merged master models.
Creating the first master
Select your first/earliest epoch and click the "Create new master model" option from the dropdown on the right.

The following dialog will appear. Rename the project name to something that makes sense for a master model (e.g. remove scan dates as this new master model will eventually contain data from multiple epochs). Select the destination collection to be the master model collection that was setup earlier.
The "preserve point cloud" option specifies that all points from the currently selected point cloud will exist in all future master model versions and will never be masked out by any newly scanned points (i.e. they will effectively be ignored by any master model point masking). Enable this option for point clouds that don't change over time (e.g. the above ground layer for an underground mining project).

After you click "begin", a new master model will be created, which at this point is simply a duplicate of your first epoch. You will be given a permalink that redirects you to this point cloud, however once you create a new master model version, the same permalink will instead redirect you to the latest version.
Creating a new version of the master model
Select your current master model and the next epoch to be merged in (you should have two point clouds selected at this point). Under the same dropdown on the right, select "Create new master model version" and the following dialog will appear. The master version number (Master 1, 2, 3...) will automatically increment and the destination collection should already be set. Clicking "Begin" will initiate a merge of the point clouds, but the merge will not be set as the new active master model until it is finalised in the 3D viewer by a user (where the include/exclude points will be defined and processed).

Finalising a merge
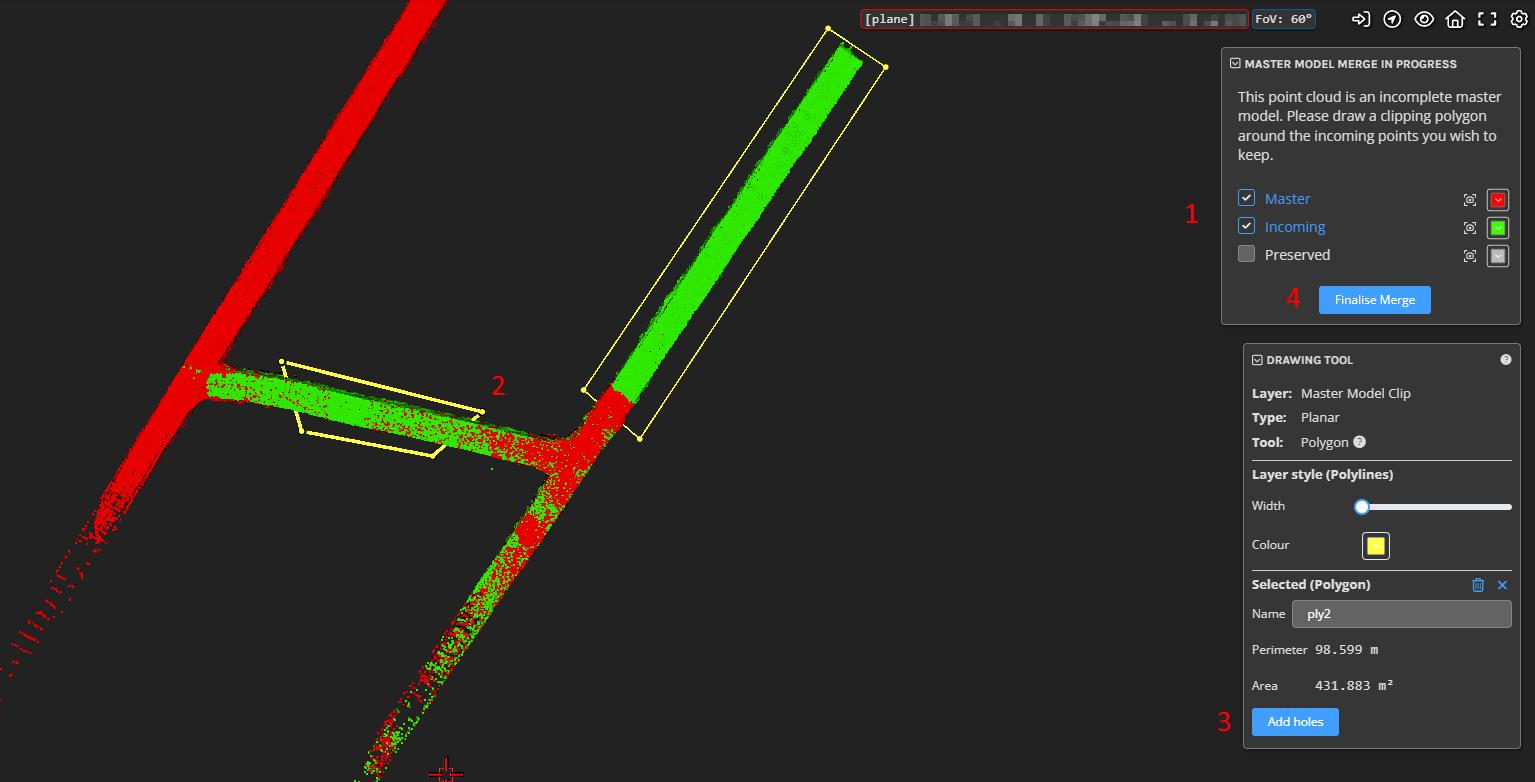
Loading the new master model version (which will not currently be set as the active version) in the 3D viewer will present a simplified interface for selecting which points of the incoming/new epoch to keep, using polygons. Any existing (red) master model points inside the polygons will be replaced with the same region of the incoming epoch (green). Points from preserved layers (grey) will be unaffected by these polygons and will not be replaced. Note that the polygon selection is currently limited to defining a 2D top-down mask (so there is no vertical masking at this point - this will be available in a future release).
First, click once to define the height at which the polygons will be drawn.
After this, click to add corners of the polygon and Enter or Escape to finish the polygon.
Clicking on an existing polygon allows you to edit it and add holes if you need finer control of the incoming points.
Once you are finished, click the finalize button to confirm your selection.
The finalization process may take a while depending on the size and complexity of the point cloud. The permalink will still link to the previous master model until this process has been completed. Once it has finished, the previous master model will become "superseded" and the status indicators will change to reflect this.
Layout guide:
Layer selector - the "Master" layer is all the existing points from the previous master model, while the "Incoming" layer is the new epoch that is being merged in. You can toggle them on or off and change their colour in this panel (this is only temporary, to help with drawing the polygons).
Drawn polygons - Multiple polygons of any shape are allowed, but they will all be drawn on the horizontal plane defined by step 1 above.
Selected polygon panel - allows you to move the corners, delete the polygon or add holes/cut-outs.
Finalise button - becomes available when at least one valid polygon is drawn.
Reverting to an old version
If you have made a mistake, you can go back to a superseded master model and select "Set as active master model" in the dropdown menu on the point cloud's main viewer page. This changes the current master model to the "active" status, supersedes the one that was previously active, and updates the permalink. Note this cannot be done while there is still a merge in progress.

Additional information
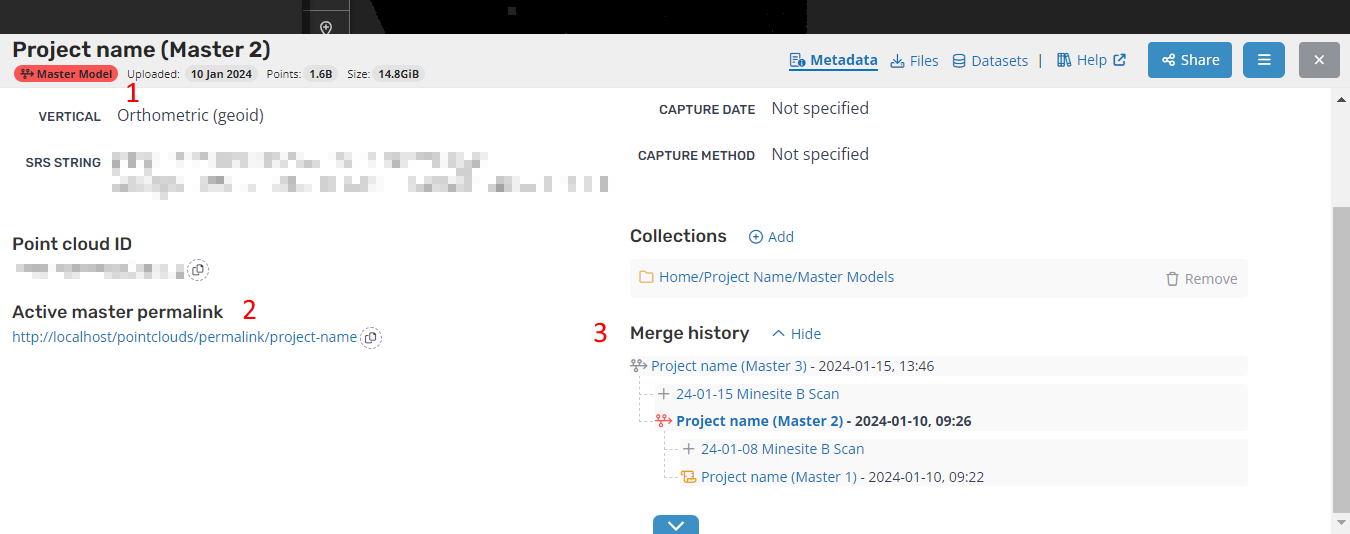
Some additional information can be found in the metadata section of the point cloud:
Status of the master model (red = "active"/"latest", orange = "superseded", grey = "merge in progress").
Permalink of the associated master model project.
Merge history showing the current point cloud in bold text, the point clouds it was merged from underneath, and the point cloud it was merged into above. The + icon indicates the point cloud was the incoming epoch for that merge.