Quick start for QA/Edit of the Poles and Wires output
Although the Poles and Wires analytics generally achieves a very high rate of automated feature extraction, it is unrealistic to assume that any machine learning/analytics process will result in 100% accuracy. In addition to failing to extract some features, it is also possible that there will be false positives (e.g. trees marked as a pole) or incorrect vectorization details (e.g. a pole extends too high due to vegetation above the pole).
With this in mind, Pointerra have created a suite of powerful, and easy to use, QA/Edit tools to complement the analytics processing. As outlined in the Poles and Wires analytics article, there is an expectation that some manual QA and editing of the initial extraction outcomes will be undertaken after the first stage of the analytics, so that accurate network data (extracted poles, wires, guys wires, etc) can be fed into the second stage of vegetation encroachment analysis and full point cloud classification.
The QA/Edit tool also allows you to initiate the next steps of the workflow, once the editing and QA is complete. Depending on your configuration options, the steps may include vegetation encroachment, final classification, and generation of various output products (SHP, KML, XLS, etc)
Activating the edit tools
The edit tools are activated by clicking on the edit icon displayed within the poles and wires dataset, as shown below.
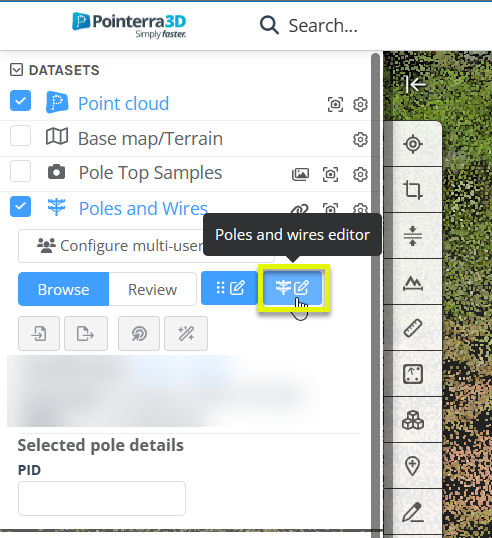
Once the tool is active, you will see the tool's dialog appear within the viewer window.
Using the tools
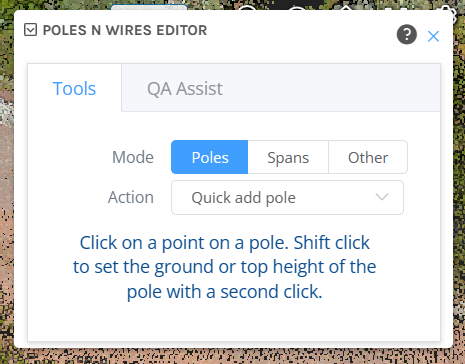
There are 3 top level modes that the tool operates in, as indicated by the Mode option buttons. Each tool/action has instructions displayed at the bottom of the tool dialog to guide you through the mechanics of using that particular tool. There are also some common shortcuts, that work across most tools, described in the help tooltip (hover your mouse over the the filled question mark symbol to view).
Most tools have shortcut keys that enable you to quickly change the active tool without having to select the tool via the tool dialog with the mouse. If you are doing a lot of editing, it is well worth familiarizing yourself with the common shortcuts so that you can efficiently switch tools.
The information below is a brief overview of the tool modes and the main tools that you will use. For a more comprehensive guide to using the Poles and Wires Edit tools, please watch the Poles and Wires edit tool help video, which works through an editing session and gives detailed information on how to make effective use of the editing tools.
Pole tools
In pole editing mode, you can create poles that were not automatically identified, make a variety of adjustment to poles that were found, or delete erroneous poles. You can also edit guys wires and service wires, as these are assumed to be attached to a pole.
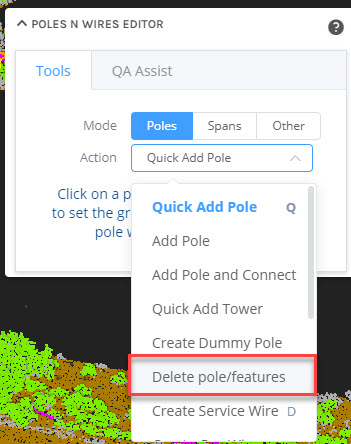
The primary tool that you will use in this mode is the Quick Add Pole tool. If you need to identify a pole in the point cloud that was not found, this tool will automatically find poles via a single mouse click somewhere on the pole. A localised version of the pole finding analytics will be run to automatically fit a pole model to the point cloud in the location that you click. If the Quick Add Pole tool does not find the pole, or incorrectly positions it, you can delete the pole (use CTRL + left click to delete it) and use one of the other more detailed pole tools to create the pole.
Span tools
The span tools allow you to define spans between two poles, and to edit the individual wires that make up each span. When using the Add Span tool, you select two poles that are linked, and the analytics will then automatically find all of the wires connecting the two poles (you can edit if required).
(3) Other
The are a number of other tools that don't necessarily relate to either poles or spans. You can find these in the Other mode.
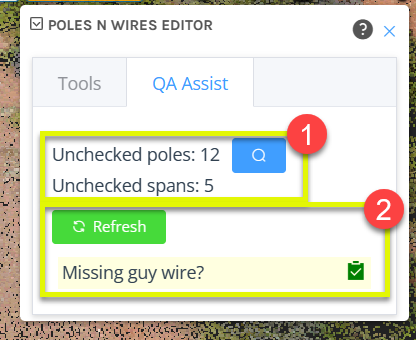
QA Assist
This tab is also located in the P&W editor window and is helpful in ensuring that all features of analytics are checked. As shown below, there are two areas that assist in the editing process, (1) helps show how many poles and spans are unchecked, and by selecting the 'search' symbol, the viewer will lock onto the next feature to be checked/edited. (2) displays a part of the feature that may be missing/incorrect, for example below it shows 'missing guy wire?'. When done with this information just select the check mark next to the prompt and hitting refresh will show it to be gone.
General Operations
Deleting Features
Irrespective of the current tool that you are using, most features can be deleted by clicking with the left mouse button while holding down the control key (Ctrl + Left Mouse Click). There is also a "paint mode" delete function that is useful for deleting a large number of features (e.g. if there are a clump of false-positive poles in a heavily forested area). You can access the paint delete mode from the Poles mode - select "Delete poles/features". When in this mode, hold down the SHIFT key while moving the mouse to delete all features that the mouse touches.
This tool also has an "Delete Connected" option that can be enabled to delete all features connected (via spans) to a deleted feature to also be deleted with a single click. This can be an effective way to delete an entire cluster of connected objects.
Undoing Edits
Many operations can be undone using the blue undo button on the dataset layer.
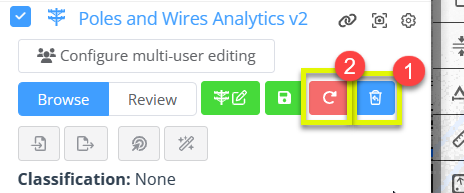
You can continue to undo previous operations until the point that a non-undoable operation is encountered. If you use the tool to perform a new operation, then the undo list will be reset to that point. (1)
If you want to undo all edits after the last save point, then use the red undo button to revert all edits back to the last save point (this cannot be undone). If you have not saved any edits, the state will be reverted to the original loaded state. (2)
Saving Edits
When you make changes to the Poles and Wires data, a save button will automatically appear within the dataset, as shown below
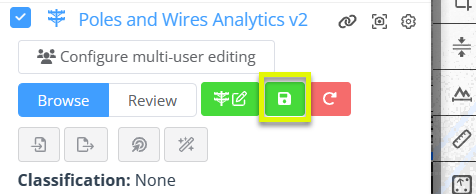
Use the save button to save any edits you have made. It is recommended to save your edits on a regular basis, in case you lose network connectivity, or so that you have the option to undo a small number of recent changes (using the revert function).
Generating classifications and encroachments
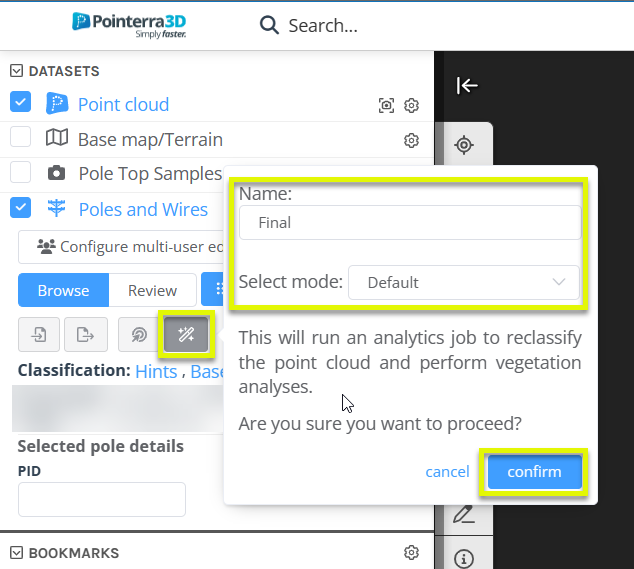
Once you have completed edits to your satisfaction, you can rerun the analytics to produce accurate data and reports for the poles and wires. To do so, select the 'wand' button (as highlighted below) and provide a name and select the analytics mode that are specific to you and your company.
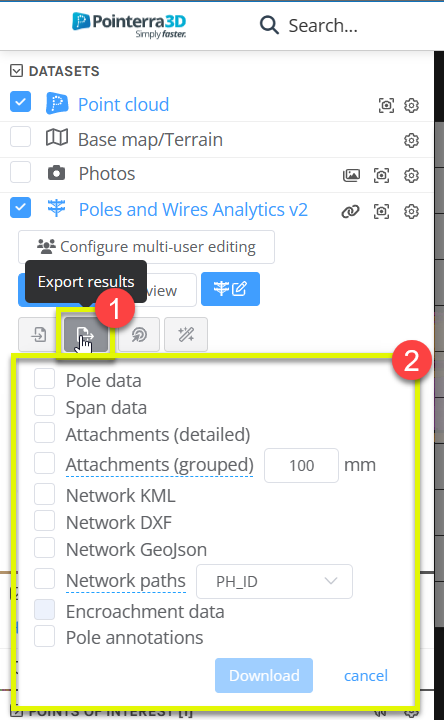
Exporting Poles and Wires data
Once you have completed edits to your satisfaction, you can export the vector data (poles, wires, guy wires, and service wires) to a CSV file using the export button (1), then selecting the different information you wish to download (2).