Edit Tool Cheat Sheet
Most of the edit tools have some common functionality and controls (these controls can be found by hovering over the Question mark in the top right corner of the tool dialog):
- Any tool requiring multiple steps or selecting poles can be cancelled using Escape.
- If a tool requires you to select multiple points, the last selected point can be removed using Backspace.
- If a tool requires to to explicitly run an action (eg. Create span wire), the action can be run using Enter.
- While any tool is active Ctrl + Click on any feature to delete it (poles, spans, span wires, pole features, encroachments, etc.).
Each tool displays help text guiding you through each stage.
Only tools that have shortcuts are listed below, other tools are more specialised and simplify specific cases such as creating and stringing multiple poles and spans together at once (Add Pole and Connect).
Color Codes
| Color | Description |
|---|---|
| Red point | Unmatched pole location with a primary key (and potentially other attributes). Generally needs to be matched with a "yellow" pole. |
| Yellow point | A pole found by the analytics or edit tools that does not have a primary key. |
| Green point | A pole found by the analytics or edit tools that does have a primary key. |
| Blue point | A "red" pole that has been flagged as 'checked' - likely because there was no pole that it could be matched to. |
| White point | A pole created from the Dummy Pole tool (not from the analytics) that is flagged as not matching the points. |
| Green pole vector | Indicates that the pole has been flagged as 'checked' (user has confirmed all data and geometry looks good with the QA tools) |
Keyboard Shortcuts
Pole Tool Shortcuts
| Shortcut | Tool | Description |
|---|---|---|
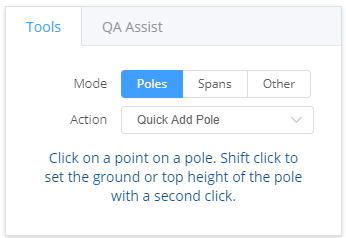
| Shift + Q | Quick Add Pole | Find a pole by clicking on a single point on the pole, quickest and easiest to use. |
| Shift + D | Create Service (drop) Wire | Select an existing pole and then click at least 3 points along the service wire including the building connection point. |
| Shift + G | Create Guy Wire | Select an existing pole and then click at least 2 points along the guy wire. It will automatically extend to ground and to intersect with the pole. |
| Shift + B | Set Base Height | Select an existing pole or guy wire and then a point at the desired pole base height by clicking a suitable ground point. |
| Shift + T | Set Top Height | Select an existing pole and then a point at the desired top height. |
|
Shift + N |
Set Pole Annotation | Select an existing pole and then provide a description/annotation for the pole |
|
Shift + L |
Quick Add Light | Select an existing pole that has a light fixture, then select a point on the head of the light. |
|
Shift + F |
Assign Companion Pole Type | Select the companion pole type (double, stub, mid-span, orphan) and then select an existing pole to assign it to. |
Useful shortcuts
- Quick Add Pole - Creating a pole while holding Shift allows you to click a second time to set the created pole's top or base height.
- Delete pole/features - Useful for mass deleting, hold Shift to delete anything under your cursor while holding the left mouse button (paint delete mode) or delete all poles connected via spans.
Span Tool Shortcuts
| Shortcut | Tool | Description |
|---|---|---|
| Shift + S | Add Span | Select the 2 poles to create a span between, runs the same algorithm as the analytics and finds all features of the span (wires, connection points, pole crossarms, etc.). Takes the longest time to complete. |
| Shift + W | Create Span Wire | Select an existing span (or the 2 poles) and then 3 points along the span wire. Simply fits a parabola through the chosen points and extends it to intersect each pole. |
| Shift + A | Assign Wire Attribute | Select an existing wire and then choose the circuit type to assign (there are shortcut number keys auto-assigned - see UI). When done, press ENTER and it should auto check any adjacent spans that have the same wires |
Useful shortcuts
- Add Span - Using Shift while creating spans will allow you to chain spans together.
Other Tool Shortcuts
| Shortcut | Tool | Description |
|---|---|---|
| Shift + X | Exchange Attributes | Select an unmatched pole with a primary key (shown as a red point in the viewer) and then a pole to assign the primary key and all other attributes to. Will automatically set the pole as 'checked'. |
| Shift + E | Edit Attributes | Select a pole and then manually edit the attributes for it. Note that each attribute is a text field and you cannot add or remove new attributes. |
| Shift + C | Mark as Checked | Select a pole or span to mark it as 'checked'. Checked spans and poles appear in a different colour, are highlighted on the map and can be hidden using the Hide checked poles filter. Useful for tracking your progress while editing. |
Workflow Tips
QA Assist
The QA Assist tab is accessible from the Edit tool dialog and can be used as a quick check of your edits. It uses simple heuristics to track a list of potential issues, including:
- Missing guy wires (often caused by a missing span on one side of a pole)
- Missing/extra span wires
- Spans without wires (can only be created from edit tools)
- Poles with a large lean
- Poles in the middle of a span
These issues only act as a guide, click on them to take you to a view of the potential issue, then either fix the issue using the edit tools and click Refresh or click the Green clipboard to ignore it (note that this is saved with the edits). It is often most useful to edit the majority of the network first (adding missing poles and spans) and then use the QA Assist to fix smaller details such as individual span and guy wires.
Completed Tasks
Each action performed by the edit tools is tracked as a running task, shown in a list at the bottom of the Edit tool dialog, so that you can see when they have completed. Tasks that take especially long (eg. Add span) are also added to a completed tasks list when they finish. From this list you can go back to a view of the span and check that all the wires and connection points have been found correctly. This allows you to create spans for a large area at once (since they take a long time to complete) and then come back and check each of them.
Other
- If a CSV file was supplied when the analytics first ran, the pole matching is very strict, running the pole matching from the viewer a second time uses a smarter match algorithm that can match a much greater proportion of the poles.
- Being familiar with the shortcut keys for the most useful tools (Quick add pole, Add Span, Check, etc.) significantly improves the speed and efficiency of editing.
- Use the map to track your progress and find unmatched poles.
- It is very easy to get lost while editing, go through the network in a logical sequence and use the Check tool to track your progress.
- Once you have finished editing, use the QA Assist tab to check your edits.