Manual Correction Tool Guide - GCP Selection
This tool is used to import or create GCPs (Ground Control Points) to accurately align the photogrammetry outputs. This can either be used to align the outputs with precisely known GPS coordinates or to ensure relative alignment with your existing data.
Adding GCPs
GCPs can be added in a number of ways:
-
Imported from:
-
Manually selected from:
It is recommended to add at least 3 GCPs, which are evenly distributed around your dataset and are visually distinct (so they can be easily found in the photos).
Please note that this tool does not currently support multiple users editing the same project at the same time. Doing this may result in a loss of progress.
Importing GCPs From a CSV File
The CSV file must contain a header row with the following columns (column order and letter case do not matter):
Name, Label or ID
Longitude or Easting
Latitude or Northing
Height, Altitude, or Elevation
Example CSV:
id,latitude,longitude,altitude
GCP-01,12.345,123.345,10.2
GCP-02,12.346,123.346,10.3
Importing GCPs From a Previous Project
If you have recaptured photos from the same location or are rerunning using a different config, you can click the "Recent project" button to load the same GCPs as a previous photogrammetry project. Note that you will still need to reselect the photo positions of each GCPs.
Manually Selecting GCPs From Existing Data
This process enables you to align your photogrammetry outputs with an existing dataset or point cloud, even if you did not collect GCPs during the photo capture process. Alternatively, you can also choose to align your outputs with the satellite imagery of the base map. Use one of these three buttons to select the data you want to align with.

Upon selection, the dataset, point cloud or base map will be loaded into the viewer. Click a visually distinct point in the 3D viewer to indicate the position of the GCP, the coordinates will be shown on the right. You can click another point to change the location, or enter a name for your GCP and click 'Add' to confirm it. Please note that once you add a GCP you cannot edit its position. To remove a GCP, click on the red delete button on the corresponding row.

Since the existing data may be several months or years old, be careful not to rely on features that can change over time.
Marking GCPs in Photos
Once you have added your GCPs, the next step is to mark the same points in the photos. Click on a GCP in the table to see a list of photos that are estimated to contain the real world GCP. This estimation is based off the initial alignment, so if your photos are not at the correct altitude relative to your GCPs, you may need to use the Vertical Offset Correction tool before continuing.
The estimated position of the GCP in the photo is indicated by a red dot. The accuracy of this initial position will vary depending on the initial alignment accuracy. There are three cases:
If the position is correct, click the green tick button in the top right to confirm
If the GCP is not visible at all (e.g. it is obstructed), click the red cross button instead
If the GCP is visible but the estimated position is not correct, click elsewhere on the photo to correct it

It is best to zoom as close as possible when marking each GCP photo position, and to only mark points near the center of images if they have noticeable edge distortion.
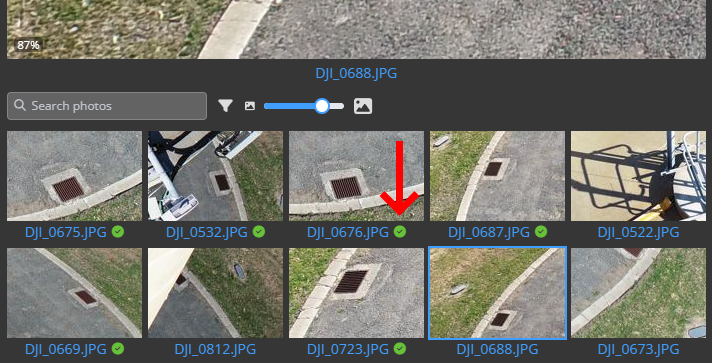
Photos marked by a green tick in the gallery view are the ones that will be used for alignment. It is recommended to mark the position of each GCP in 3-6 images.
Validation
Once processing has completed, you can view the processing report where the errors of each GCP are displayed. Additionally, you can download a CSV of the GCPs used in the project, as well as a JSON file containing all of the marked photo positions (in pixel coordinates).
